Tuesday, May 31, 2016

Panther Restoration

The Panther Restoration Project Has Begun.

After a lot of head scratching and a fair amount of indecision, at long last the project has begun.
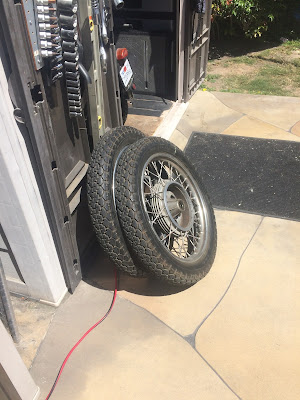
The first thing that got me off dead center on this was the tires. From the date code they look to be about 23 years old.

As you can see the side walls are pretty cracked too.


The wheels have gone to Wheelworks in Garden Grove for new tires, re-chrome and new spokes.

All of the black metal parts except the frame are going to Primo Powder Coating in Huntington Beach for refinishing.


I'm trying to get a new seat from an outfit in the UK who specialize in vintage bike stuff.
However, it seems that they march to the beat of a different drum.
Still waiting for a formal quote after more than a week.


I can't tell if the seat pan is original or not.
But for sure the two pieces of rolled steel angle on the rear attachment points are not original.

The gas tank has gone to Classic Cycles in the city of Orange.
Check them out at the link below.


The tank needs some body and fender work along with re-chrome and paint to restore it to former glory.


There are numerous dings scratches and scrapes which need to be removed before the chrome and paint are applied. 
Italian Red,  RAL 3003 to be precise.


I have one last hurdle to overcome to remove the swing arm, the factory drawing shows a stud passing through the frame and the gearbox, even though it is called out as a bolt. 
On my bike it is a bolt, with the head on the wrong side to allow it to be removed without taking the primary drive and clutch apart.
More on that later when I decide how to tackle that problem.

Currently, the team at Sheddington are working on tooling for the dis-assembly of the rear shocks.


More soon on the project.

Ciao Bella,
Norm

Thursday, April 28, 2016

Speedo Day At Sheddington!


No, Not That Kind Of Speedos


We were working on the speedometers for both the Kawasaki and the Panther.

The Kawasaki was fairly straight forward, just a broken cable to replace.
However, you need to remove about a hundred screws of sixty different lengths to take off the various fairing parts allowing access to the speedo.


With that problem solved and all of the plastic reinstalled, we moved on to the Panther.

Here's a top tip, when you have a part or tool that is essential to the project, set it next to your beer, then you will have no trouble finding it.


We modified the input device to allow it to work with the rear wheel speedo drive and hooked it up to the system.
The gauge seemed to work but nothing we could do with the input device would make the needle move.

Obviously a bit more work was needed.
So, using our normal troubleshooting technique, back to basics, what did you last touch?
All of the wiring connections were stripped and cut apart.
Then the wiring diagram was rechecked.


Using the speedo negative earth (ground) system it was found that there was a variance in the color scheme. The wire labelled "Not Used" on the right side of the panel was not in fact hooped but striped. With my aging myopia, I had connected this to ground!
On the second pass this problem was corrected and the system worked as it should.

There is a link below showing a video of how it now works.

Smith's Gauge Electronic Speedometer

A final word on SPEEDOS.


Who could put it better?

Ciao Bella
Norm

Tuesday, April 19, 2016

Finally Some Progress On The Kawasaki

A New Day Dawns.

After much research on the web and lots of differing opinions, Rick took out the reed valves located in the valve covers.
Lo and Behold they were in upside down! 

They should look like this.


They actually looked like this.


Blanking plates were sourced and installed. The reed valves do nothing except add complexity and unnecessary frustration.
OK CARB may disagree, big deal.

The bike now starts and runs as it should.

Today we rechecked the carb sync and installed new brake pads all round.
One final problem needing attention was that the speedometer did not work.

Whilst we had the front wheel off the ground to change the brake pads, we disconnected the speedo cable from the front wheel.


When we did, this piece fell out.
I think that we may have found the problem with the speedo...

More soon on the Panther, honest....

Norm

Saturday, April 16, 2016

Playing Catch Up

It's been a while since I wrote up the bike blog.
Between then and now lots of things have happened.
We have been to the UK for a family visit, see the travel blog for that info.
Norm's Travels

OK, the big news is that the Kawasaki has been kicking our ass.
Normally we can sort problems in no more than two weeks working on them part time.
With the Kawasaki, it's been close to a month and only minimal progress.

The bike starts fine, but then the problems begin.

This is a record of our attempts so far:
Kawasaki Concours
What we know.
1)The engine starts and runs.
2) The engine RPM will increase correctly but not return to idle at the correct rate.
3)  If a combustible liquid is sprayed over the carburetor boots the engine RPM will increase.

What we have done so far.
1) Carbs have been checked and are clean. All orifices are clear .
2) The diaphragm and slide have been changed in one carb.
3) The idle needle has been changed in one carb.
4) All of the intake boots between the carbs and cylinders have been checked and look to be sound.
5) The throttle and choke linkages have been checked and appear to be correct.
6) All CARB required components have been connected and made no improvement.
7) The screws in the intake boot clamps have been replace to allow for better tightening.

What to try next.
1) Install new rubber boots on the carb to cylinder connections.

2) Connect the sync tool and compare readings across all four carbs.

We have installed new rubber boots, and attached the sync tool.

A new problem appeared.
When carrying out these tests, we use a temporary fuel tank which holds about a quart of gasoline.
That's about 0.94 liters of petrol for those on the other side of the pond who like those French measurements.

We were doing a bit of head scratching with the motor running when we noticed that the temporary tank was empty. Just then the motor stopped, it was not like it ran out of gas, it just stopped dead.
When we tried to crank it again, it was apparent that it was locked up. We looked at each other with that "Oh Shit" look.

Just to be sure we took out the plugs and tried turning overt the motor with the rear wheel. 
No luck.
After a quick battery charge we tried the starter again, this time the motor turned over and blew a quart of gas out of the #4 spark plug hole. It was a bit like "Thar She Blows" and an oil well strike, Rick and I were both covered in gas.

Fortunately we get to work outside, so the gasoline smell evaporated pretty quickly.

Tosca was singularly unimpressed.


This is how you can tell that we are struggling,  Rick has his hat on backwards and is reading the instructions!

The #4 carb was removed and a new float and needle was installed.
Once new plugs were fitted, we tried again. The bike fired right up so we went into the carb sync routine.


After a few minutes, it was running better than we had ever seen it.

I packed up my tent (metaphorically speaking) and headed for the beach.
A couple of hours later, I got a call.
"Back to square one"
With the tank installed and some CARB shit hooked up it  would not return to idle as it should.

More on this debacle following my next visit to Sheddington North.


The next post, tomorrow I hope, will detail some progress with the Panther.

Norm

Sunday, March 27, 2016

A Busy Week

Wow! This Is Getting To Be Like A Regular Job.

Nah! not even.

We do this stuff because we love doing it.

The first project was to make the side stand for the Panther work in some sort of way where it would hold up the bike without bending something else.

After some head scratching we decided on using what appeared to be the rear sidecar mount weldment.

The side stand which came with the bike was man enough for the job but just not well attached.
I came up with a bracket design to attach to the existing stand. So after machining the stand I took both the stand and the bracket to JB, my favorite welder and had him join the pieces.
That crappy brazing you can see was part of the original set up and not the work of JB.

Once back at Sheddington, I set about machining the bracket to fit the bike.
As there could be only one bolt to make the attachment, a method to prevent rotation on that bolt was needed.
I decided after a lot of cogitation and perhaps one or two Buds to machine a slot register in the bracket.
The tough part was making the mating key register on the bike. To make this a little easier, it was decided to make a gauge bolt. 
The threaded hole in the sidecar mount was 3/4-20 Whitworth form. (Yes, about as common as rocking horse shit)

I bought a couple of bolts from the local Ace to use as starting stock.


OK they're crap bolts and ungraded but a 3/4" bolt of almost any kind will hold the side stand.

I made the gauge bolt and after a couple of tries got it to screw in to full depth.
Then two of the flats were machined to give a dimension of 1" AF.
The bolt was screwed in and the machined flats aligned to be vertical.
The mount was ground to match the bolt.

This is the bracket after the slot was machined, as you can see it was within 0.001" of the desired dimension.

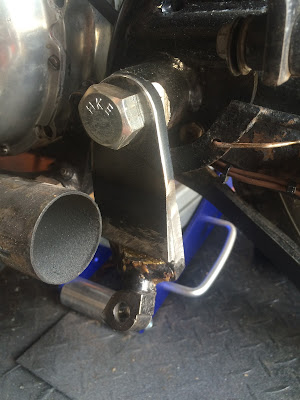
Here is the bracket mounted to the sidecar attachment point.

It was necessary to make a standoff for the muffler to prevent the stand from impinging on it.

This was the first pass at it, which ended up being just a little too long.I shortened it up and now it is just right. That piece will be found by some industrial archeologist in about a hundred years and will have him or her scratching their head. "Crazy people back then, this thing is BSF on one end and UNF on the other"


The proof of the pudding, as they say, is in the eating thereof.

Here is the stand in place and after a bit of judicial heating and pounding the lower end was made to sit flat on the ground.

Thanks to Jimmie with the big hammer and the torch.


The next project in the form of a short video is about the manufacture of the orifices required to make a carb sync tool work.


All the best,

Norm

Tuesday, March 22, 2016

A Day of Diddling

More Headaches.

Tuesday I drove over to Rick's house to help with the Kawasaki.
We took off the gas tank and the carburetors to check the intake connections to the cylinders.
Now this is one of those arrangements designed by a sadist.
If you could remove the air filter canister it would be easy; I think it must be the first part installed in the frame at the factory. The only way I can see to get it out is to take the gas ax to the frame.
You have to remove all of the hoses and cables, then you can tug, pull, and push the four-carburetor assembly out from in between the rubber boots it sits between.


Here you can see the carbs.

One of the problems with them being so close is that the clamp screws on the rubber boots get worn over time due to the screwdriver slipping or the wrong screwdriver being used.
We decided to install socket head screws, of course each side of the boot uses a different screw.
Off we went to Ace hardware to grab new screws. We started re-assembly only to find that one of the new screws was wrong. Not enough so that you would notice, it was probably a stock SAE screw dropped into the metric bin.
GRRRRR! back to the store for a new screw. (As the actress said to the bishop)
Now you have the reverse problem, pushing the carbs back through the gap between the boots and hooking up the cables and hoses.

Once it was all connected we tried running the bike, it starts up real nice and idles OK but when you run up the revs it takes a long time to come back down to idle.

After disconnecting the CARB (California Air Resources Board) required bits, multiple valves, hoses etc we found that by inserting a small orifice in the vacuum line from the manifold the engine speed came down much better. Hmm, maybe we are onto something.


We reconnected all the CARB stuff and it worked well for a short while then started acting up again.
It's my opinion that the problem lies in one or more of the emission control components.
More research and diddling required.


One of the benefits of living in So-Cal is of course the weather, here we are working under the shade of a palm tree with Hibiscus flowers in bloom.

As we now have clear skies most of the time I guess that I shouldn't bad mouth the CARB restrictions too much.
I still think that they should not apply to motorcycles.
Just my opinion...

Ciao 
Norm

Monday, March 21, 2016

Sheddington Transport Division Comes Through Again

Another Rescue


My brother Jimmie called to ask if I was available last Saturday. That is the real Saturday, not my Saturday which is any day now that I'm retired.
At first he told me that we were going to Venice Beach (the one in California) now that's a strange neighborhood.
However, when we checked further it was actually Marina Del Rey where we were going.
We were going to pick up , if the deal was OK, a 2001 Kawasaki Concours 1000.
We arrived to find that the address was a dealership.

The guy selling the bike was keeping it there.
I have to say these were some of the nicest guys I've ever met at a dealership of any kind.


The owner showed up and tried to start the bike, but it was not co-operating.
Rick decided to buy it anyway.
As both the buyer and the seller are from Texas, there was a lot of BS going around.
Then of course there was Arthur who is a big football fan of a Texas team who shall remain nameless adding to the BS.
I needed rubber boots!

Now the problem comes, how to push a big ass heavy old motorcycle up the ramps on to the truck.

Whilst we were discussing this and bearing in mind the narrow escape from disaster on our last mission; the two service guys led by Oscar told us to get out of the way.

They pulled the bike into the workshop and then took a good run at it, the bike was on the truck in a heartbeat.
Well done guys, and thank you.
On a different note, Oscar allowed me into the workshop, something most places frown upon, to look at the jacks that they use on their lifts, I now have the same jack on my lift.
As I said really friendly and professional guys who know their stuff.


We tied it down and off we went, headed for Long Beach.

Once back at Rick's house the prize was unloaded and placed in the yard.


Of course here we have to push it uphill to get it on the ramps.


Here it is in all its glory.

After about four hours Rick had it running, kinda sorta.
Now it runs but has some carburetor problems.

Tomorrow (Two Wheel Tuesday) we will start on that issue.

More soon.

Keep the shiny side up and your knees in the breeze.

Ciao
Norm