Wednesday, October 19, 2016

More Panther Work

Panther Work Progressing

After a long summer lay off from bike work, I finally got back into it last week.
The front forks were disassembled and the parts separated for different repair requirements.

Ten pieces including the fork tubes were taken to Primo for powder coating. As usual, Dan had them turned around double-quick.

The next job was to remove the exhaust headers from the cylinder head.
Neither one was going to be easy as they looked very seriously corroded.
I have never been a fan of "Snake Oil" but I must admit that after experience using KROIL at the plant I was happy to give it a try.


It's not magic and it's not going to be quick but it does work.
After an overnight soak the left side gave up and came off right away.
The right side was another story.
After several soaks and heating, I was about ready to cut the nut off.
I gave it one last try, heat it up then soak with KROIL an small amount of persuasion and Voila!
Both headers removed.
The threads on both the nuts and cylinder head will need to be wire brushed to remove rust, but that should not be too much trouble.

Yeah! I know, looks like it has been running rich.

The next job was to dis-assemble the fork stanchions.

After a some info and pictures from the Panther Owners Club members, I was able to confirm how I thought they should come apart.


There is a nut with two flats which retains the spring and the bottom bushing.

Note the different sized damping holes in the stanchions.

I tried to remove the nut from the right side with no luck at all.

Then the left side was attempted and it came apart fairly easily confirming that I had the right idea on how they were assembled.

The wrench that I have fit correctly but would not move the right nut at all.


A good quality Craftsman wrench from Sears, but more than likely made in China now.
That's what happens when K-Mart takes over.
The problem being that with only two flats it is real easy to compress the corners.

Drastic measures were called for.

The stanchion was set up in the mill to make the nut into a hexagon.
This was a bit tricky as the only way I could make it fit was to have the nut away from where I could see the flats.

This made it necessary to use a mirror to see the flat lined up with the precision angle gauge.

Once having the set up in place it was just a case of repeating it four times.

When the cutter touched the nut the Z axis was moved down by 0.064" and a cut taken.

Tools used in the setup.

I had on hand a wrench that I had made to take some of the frame bolts out, it just happened to be the right size, 1.312 AF.


Using this wrench on the now hexagon nut, removal was achieved quite quickly.

As you can see, one of the two original flats had been subject to some violence in the past.

From the POC website information, I have decided to make the damping holes the same on both sides, that will entail plugging four holes on one side and drilling two new holes.
The plan is to make four brass plugs and silver solder them in place.
The brass is on it's way from Amazon.

Following that the next  task on the fork stanchions is to have the OD hard chromed and ground, they have been scored up pretty badly in the past, I polished them up but I don't think that the seal will hold oil.

So, I will need to try to think of someone to help out with this project.

Hmmm.

More soon,
Norm

Thursday, July 14, 2016

More on Bikes

I know that it has been a while since I posted anything about our bike activities.
That does not mean we have been sitting around on out duffs drinking beer, well yes we have been doing that too.

Jointly, my brother Jimmy and I have been working on Kawasakis, BMWs  Panthers, and Velocettes.

As well as a Ford truck.

Our most recent task was to change the transmission fluid in a BMW RT 1100 recently acquired by Jimmy as a non-runner with a burnt valve.

 61,000 miles serviced by the dealer at every required interval.
Yes we can fix it for $3500.
Hmmmm.

Rick bought the bike for way less than that from a guy who has an independent BMW shop but not a dealership.
The guy gave him two spare heads with the bike.
A few hours work and one valve was transferred from the spare head to the bike and it was up and running.

Well done Jimmy.

We needed two umbrellas to keep the sun at bay whilst we worked on it.
Yeah, I know that was just for the guys who live in less sunny climes,
Next we need an EZ-UP with the Sheddington Logo.


It was decided to use synthetic transmission fluid from Red Line.
This stuff looks like used Pepto Bismol.

It has the reputation for reducing noise and wear, we'll see.

As the drain and fill plugs are somewhat buried we went out and bought this fancy funnel.


What a trip device this is.
As you can see it is graduated in ounces and milliliters.
You remove the lid, pour in the precise amount and insert the tube in the appropriate spot then turn the blue connector to allow the fluid to flow.

All for five bucks!

Once we were done with all of that it was time for a beer.


This one is Rick's favorite but he only allows himself one per day.

Too many calories.

You have to keep an eye on that stuff when you get old.

I'm in love with an Italian red head living in Yorkshire, we'll see how that works out.


More soon.

Norm

Tuesday, May 31, 2016

Panther Restoration

The Panther Restoration Project Has Begun.

After a lot of head scratching and a fair amount of indecision, at long last the project has begun.
The first thing that got me off dead center on this was the tires. From the date code they look to be about 23 years old.

As you can see the side walls are pretty cracked too.


The wheels have gone to Wheelworks in Garden Grove for new tires, re-chrome and new spokes.

All of the black metal parts except the frame are going to Primo Powder Coating in Huntington Beach for refinishing.


I'm trying to get a new seat from an outfit in the UK who specialize in vintage bike stuff.
However, it seems that they march to the beat of a different drum.
Still waiting for a formal quote after more than a week.


I can't tell if the seat pan is original or not.
But for sure the two pieces of rolled steel angle on the rear attachment points are not original.

The gas tank has gone to Classic Cycles in the city of Orange.
Check them out at the link below.


The tank needs some body and fender work along with re-chrome and paint to restore it to former glory.


There are numerous dings scratches and scrapes which need to be removed before the chrome and paint are applied. 
Italian Red,  RAL 3003 to be precise.


I have one last hurdle to overcome to remove the swing arm, the factory drawing shows a stud passing through the frame and the gearbox, even though it is called out as a bolt. 
On my bike it is a bolt, with the head on the wrong side to allow it to be removed without taking the primary drive and clutch apart.
More on that later when I decide how to tackle that problem.

Currently, the team at Sheddington are working on tooling for the dis-assembly of the rear shocks.


More soon on the project.

Ciao Bella,
Norm

Thursday, April 28, 2016

Speedo Day At Sheddington!


No, Not That Kind Of Speedos


We were working on the speedometers for both the Kawasaki and the Panther.

The Kawasaki was fairly straight forward, just a broken cable to replace.
However, you need to remove about a hundred screws of sixty different lengths to take off the various fairing parts allowing access to the speedo.


With that problem solved and all of the plastic reinstalled, we moved on to the Panther.

Here's a top tip, when you have a part or tool that is essential to the project, set it next to your beer, then you will have no trouble finding it.


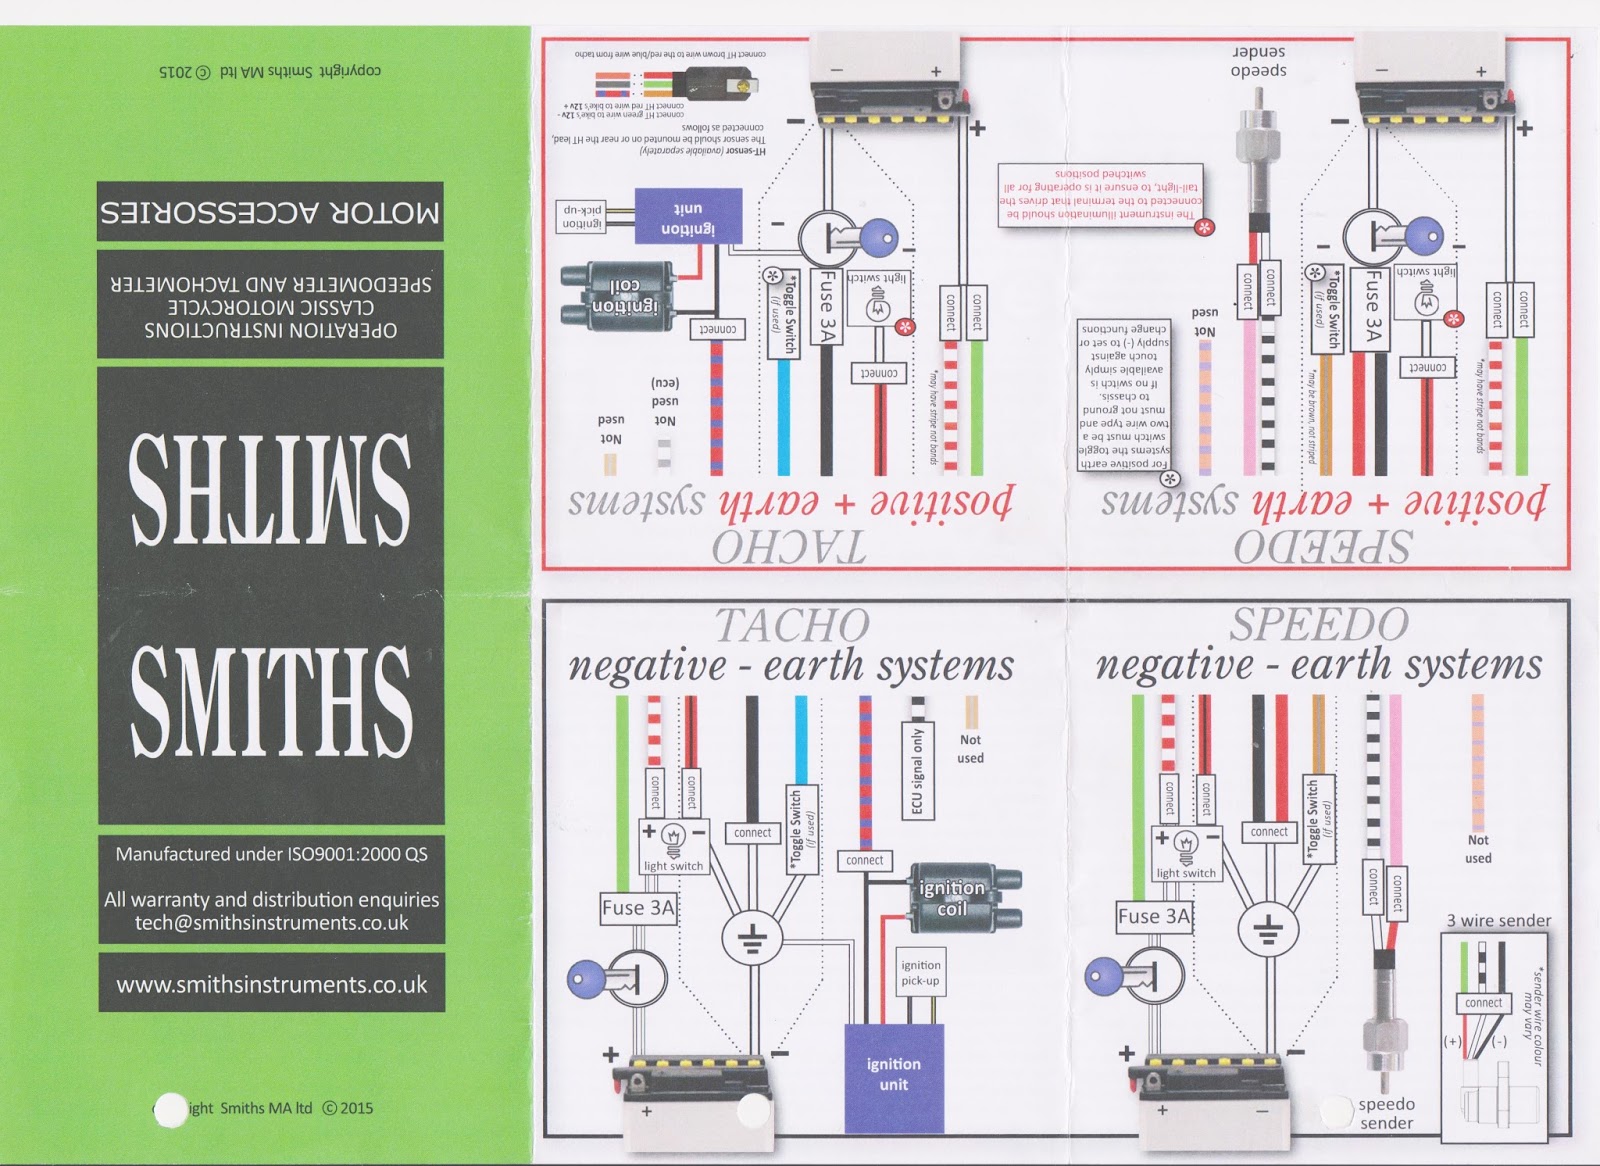
We modified the input device to allow it to work with the rear wheel speedo drive and hooked it up to the system.
The gauge seemed to work but nothing we could do with the input device would make the needle move.

Obviously a bit more work was needed.
So, using our normal troubleshooting technique, back to basics, what did you last touch?
All of the wiring connections were stripped and cut apart.
Then the wiring diagram was rechecked.


Using the speedo negative earth (ground) system it was found that there was a variance in the color scheme. The wire labelled "Not Used" on the right side of the panel was not in fact hooped but striped. With my aging myopia, I had connected this to ground!
On the second pass this problem was corrected and the system worked as it should.

There is a link below showing a video of how it now works.

Smith's Gauge Electronic Speedometer

A final word on SPEEDOS.


Who could put it better?

Ciao Bella
Norm

Tuesday, April 19, 2016

Finally Some Progress On The Kawasaki

A New Day Dawns.

After much research on the web and lots of differing opinions, Rick took out the reed valves located in the valve covers.
Lo and Behold they were in upside down! 

They should look like this.


They actually looked like this.


Blanking plates were sourced and installed. The reed valves do nothing except add complexity and unnecessary frustration.
OK CARB may disagree, big deal.

The bike now starts and runs as it should.

Today we rechecked the carb sync and installed new brake pads all round.
One final problem needing attention was that the speedometer did not work.

Whilst we had the front wheel off the ground to change the brake pads, we disconnected the speedo cable from the front wheel.


When we did, this piece fell out.
I think that we may have found the problem with the speedo...

More soon on the Panther, honest....

Norm

Saturday, April 16, 2016

Playing Catch Up

It's been a while since I wrote up the bike blog.
Between then and now lots of things have happened.
We have been to the UK for a family visit, see the travel blog for that info.
Norm's Travels

OK, the big news is that the Kawasaki has been kicking our ass.
Normally we can sort problems in no more than two weeks working on them part time.
With the Kawasaki, it's been close to a month and only minimal progress.

The bike starts fine, but then the problems begin.

This is a record of our attempts so far:
Kawasaki Concours
What we know.
1)The engine starts and runs.
2) The engine RPM will increase correctly but not return to idle at the correct rate.
3)  If a combustible liquid is sprayed over the carburetor boots the engine RPM will increase.

What we have done so far.
1) Carbs have been checked and are clean. All orifices are clear .
2) The diaphragm and slide have been changed in one carb.
3) The idle needle has been changed in one carb.
4) All of the intake boots between the carbs and cylinders have been checked and look to be sound.
5) The throttle and choke linkages have been checked and appear to be correct.
6) All CARB required components have been connected and made no improvement.
7) The screws in the intake boot clamps have been replace to allow for better tightening.

What to try next.
1) Install new rubber boots on the carb to cylinder connections.

2) Connect the sync tool and compare readings across all four carbs.

We have installed new rubber boots, and attached the sync tool.

A new problem appeared.
When carrying out these tests, we use a temporary fuel tank which holds about a quart of gasoline.
That's about 0.94 liters of petrol for those on the other side of the pond who like those French measurements.

We were doing a bit of head scratching with the motor running when we noticed that the temporary tank was empty. Just then the motor stopped, it was not like it ran out of gas, it just stopped dead.
When we tried to crank it again, it was apparent that it was locked up. We looked at each other with that "Oh Shit" look.

Just to be sure we took out the plugs and tried turning overt the motor with the rear wheel. 
No luck.
After a quick battery charge we tried the starter again, this time the motor turned over and blew a quart of gas out of the #4 spark plug hole. It was a bit like "Thar She Blows" and an oil well strike, Rick and I were both covered in gas.

Fortunately we get to work outside, so the gasoline smell evaporated pretty quickly.

Tosca was singularly unimpressed.


This is how you can tell that we are struggling,  Rick has his hat on backwards and is reading the instructions!

The #4 carb was removed and a new float and needle was installed.
Once new plugs were fitted, we tried again. The bike fired right up so we went into the carb sync routine.


After a few minutes, it was running better than we had ever seen it.

I packed up my tent (metaphorically speaking) and headed for the beach.
A couple of hours later, I got a call.
"Back to square one"
With the tank installed and some CARB shit hooked up it  would not return to idle as it should.

More on this debacle following my next visit to Sheddington North.


The next post, tomorrow I hope, will detail some progress with the Panther.

Norm

Sunday, March 27, 2016

A Busy Week

Wow! This Is Getting To Be Like A Regular Job.

Nah! not even.

We do this stuff because we love doing it.

The first project was to make the side stand for the Panther work in some sort of way where it would hold up the bike without bending something else.

After some head scratching we decided on using what appeared to be the rear sidecar mount weldment.

The side stand which came with the bike was man enough for the job but just not well attached.
I came up with a bracket design to attach to the existing stand. So after machining the stand I took both the stand and the bracket to JB, my favorite welder and had him join the pieces.
That crappy brazing you can see was part of the original set up and not the work of JB.

Once back at Sheddington, I set about machining the bracket to fit the bike.
As there could be only one bolt to make the attachment, a method to prevent rotation on that bolt was needed.
I decided after a lot of cogitation and perhaps one or two Buds to machine a slot register in the bracket.
The tough part was making the mating key register on the bike. To make this a little easier, it was decided to make a gauge bolt. 
The threaded hole in the sidecar mount was 3/4-20 Whitworth form. (Yes, about as common as rocking horse shit)

I bought a couple of bolts from the local Ace to use as starting stock.


OK they're crap bolts and ungraded but a 3/4" bolt of almost any kind will hold the side stand.

I made the gauge bolt and after a couple of tries got it to screw in to full depth.
Then two of the flats were machined to give a dimension of 1" AF.
The bolt was screwed in and the machined flats aligned to be vertical.
The mount was ground to match the bolt.

This is the bracket after the slot was machined, as you can see it was within 0.001" of the desired dimension.

Here is the bracket mounted to the sidecar attachment point.

It was necessary to make a standoff for the muffler to prevent the stand from impinging on it.

This was the first pass at it, which ended up being just a little too long.I shortened it up and now it is just right. That piece will be found by some industrial archeologist in about a hundred years and will have him or her scratching their head. "Crazy people back then, this thing is BSF on one end and UNF on the other"


The proof of the pudding, as they say, is in the eating thereof.

Here is the stand in place and after a bit of judicial heating and pounding the lower end was made to sit flat on the ground.

Thanks to Jimmie with the big hammer and the torch.


The next project in the form of a short video is about the manufacture of the orifices required to make a carb sync tool work.


All the best,

Norm